

- Published on
Publishing a React component to npm using Vite
- Authors
- Name
- Tom Southall
- @tomsouthall


Overview
This guide is designed to help you build a React component using Vanilla JS and then publish it to npm as a package for re-use by other React applications.
Like, me you may have found that publishing a React component is not quite as straightforward as you may have first imagined. After much tinkering I've ended up with a very handy setup which I can re-use for any project.
We are going to use Vite as our build tool and local development environment. If you're not familiar with Vite, it's a super-fast, super-lean build tool that leverages the ability to use native ES modules in modern browsers. In short, it's great.
Guide
All the code in this guide is available in the accompanying repository on Github.
Pre-requisites
- You have Git installed
- You have Node.js and npm installed
- You have an npm account and are logged in
Initial Set Up
Create your project folder and
cdinto it. For the sake of this guide, we'll assume your component is calledmy-component$ mkdir my-component $ cd my-componentCreate a new git repository
$ git init .Create the following folders and files. All the files can be left empty for now:

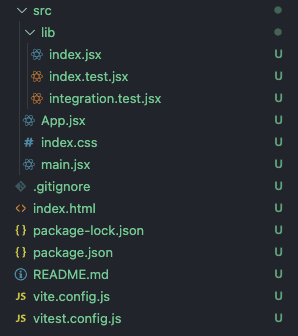
Your component files that will be bundled and packaged ready to be published to npm live in the /src/lib folder. The other files in /src are only needed for the development environment. They will be ignored at build time.
My preference for test files is to have them live alongside the file that they are testing, in this case in /src/lib but these could be placed, for example, in a separate __tests__ folder if you prefer.
Note that in Vite, jsx files must have a .jsx file extension and not .js.
Configure .gitignore
In your editor, open
.gitignorePaste the following and add any other files or folders you may wish to ignore.
# dependencies
/node_modules

# testing
/coverage

# component build
/dist

# misc
.DS_Store
Configure package.json
In your editor, open
/package.jsonand paste in the following:{ "name": "my-component", "version": "0.0.0", "description": "", "license": "MIT", "author": "", "keywords": [], "files": [ "dist", "README.md" ], "main": "./dist/my-component.umd.js", "module": "./dist/my-component.es.js", "exports": { ".": { "import": "./dist/my-component.es.js", "require": "./dist/my-component.umd.js" } }, "scripts": { "dev": "vite", "build": "vite build", "test": "vitest run", "watch": "vitest", "coverage": "vitest run --coverage" }, "browserslist": { "production": [ ">0.2%", "not dead", "not op_mini all" ], "development": [ "last 1 chrome version", "last 1 firefox version", "last 1 safari version" ] }, "eslintConfig": { "env": { "browser": true, "node": true, "es2020": true }, "extends": [ "eslint:recommended", "plugin:react/recommended" ], "parserOptions": { "sourceType": "module" } } }Replace all instances of
my-componentwith your component/package name. This must not already be a name taken by another npm package as this is what users will type to install your component in their projects, for example:npm install my-component. You can check whether the name is already taken by searching for it on the npm website.Add your own values for
description,authorandkeywordsChange the license to your preference
Install React as a development dependency. We do not install it as a production dependency because the React app that uses your component package is responsible for the React product dependency.
$ npm install react react-dom --save-devInstall Vite as a development dependency.
$ npm install vite @vitejs/plugin-react --save-devInstall all the development dependencies required for testing and linting
$ npm install @testing-library/dom @testing-library/react c8 eslint eslint-plugin-react jsdom react-test-renderer vitest --save-dev
Configure Vite
In your editor, open
/vite.config.jsand paste in the following:import path from 'path' import { defineConfig } from 'vite' import react from '@vitejs/plugin-react' export default defineConfig({ build: { lib: { entry: path.resolve(__dirname, 'src/lib/index.jsx'), name: 'My Component', fileName: (format) => `my-component.${format}.js` }, rollupOptions: { external: ['react', 'react-dom'], output: { globals: { react: 'React' } } } }, plugins: [react()] })Make sure you replace
name: 'My Component'with the name of your componentLikewise, make sure that
my-componentin thefileNamevalue is changed to the name of your component
Configure Testing and Linting
In your editor, open
/vitest.config.jsand paste in the following:import { defineConfig } from 'vite' export default defineConfig({ test: { globals: false, environment: 'jsdom' } })If you prefer different ESLint rules, configure these in
eslintConfiginpackage.json
Write your Component along with Snapshot Tests
The entrypoint for your component is /src/lib/index.jsx. You can of course create a whole set of child components too within /src/lib as you would in any React app.
For now you may want to create a dummy HelloWorld component as in the examples below, then once the development environment is set up, come back and build your component.
Create your component in
/src/lib/index.jsx. Here's a very simple example:import React from 'react' export default function HelloWorld(props) { const { greetee = 'World' } = props return ( <div>Hello, {greetee}!</div> ) }Add snapshot tests to
/src/lib/index.test.jsx. For example:import React from 'react' import renderer from 'react-test-renderer' import { describe, expect, test } from 'vitest' import HelloWorld from './index' describe('HelloWorld', () => { test('HelloWorld component renders correctly', () => { const component = renderer.create( <HelloWorld /> ) const tree = component.toJSON() expect(tree).toMatchSnapshot() }) test('The greetee prop works', () => { const component = renderer.create( <HelloWorld greetee={'Universe'} /> ) const tree = component.toJSON() expect(tree).toMatchSnapshot() }) })
You can run your tests from the command line by typing:
$ npm test
Or you can run tests and set a watch to re-run tests when anything changes.
$ npm run watch
Note: Running snapshot tests will create a /src/lib/__snapshots__ folder. Do not gitignore this folder. Snapshot tests are intended to be committed to your Git repository.
Set Up the Development App
We need to create a development React app in order to test your component library.
Open
/index.htmland paste in the following. Change the<title>element to whatever you choose.<!DOCTYPE html> <html lang="en"> <head> <meta charset="UTF-8" /> <meta name="viewport" content="width=device-width, initial-scale=1.0" /> <title>My React Component</title> </head> <body> <div id="root"></div> <script type="module" src="/src/main.jsx"></script> </body> </html>Open
/src/main.jsxand paste in the following:import React from 'react' import ReactDOM from 'react-dom' import './index.css' import App from './App' ReactDOM.render( <React.StrictMode> <App /> </React.StrictMode>, document.getElementById('root') )Open
/src/index.cssand enter any CSS you want to be applied to the local development page, for example:body { font-family: sans-serif; }Open
/src/main.jsxand paste in the following, replacing theHelloWorldcomponent with your own.import React from 'react' import HelloWorld from './lib' const App = () => { return ( <HelloWorld greetee={'Universe'} /> ) } export default App
To launch the development environment from the command line enter:
$ npm run dev
You can then navigate to http://localhost:3000 in your browser to see your component.


Validate Props
(Optional)
I recommend typechecking your component's props. This will help developers who are using your component in their projects to ensure they are passing the expected types. This only applies if you are using Vanilla JS as assumed by this guide. Typescript does away with this need.
Install the prop-types package as a production dependency:
$ npm install prop-typesAdd validation rules, for example in our
/src/lib/index.jsxfile, we would make the following additions:import React from 'react' import PropTypes from 'prop-types' export default function HelloWorld(props) { const { greetee = 'World' } = props return ( <div>Hello, {greetee}!</div> ) } HelloWorld.propTypes = { greetee: PropTypes.string }
Integration Testing
(Optional)
If your component is at all complex and has child components, then writing integration tests is highly recommended so that you can test your component as an end-user. Snapshot and unit tests can even be replaced in many instances by good integration tests using Testing Library.
Here is an example /src/lib/integration.test.jsx for our dummy HelloWorld component:
import * as React from 'react'
import { render, screen, cleanup } from '@testing-library/react'
import { describe, expect, test, afterEach } from 'vitest'
import HelloWorld from './index'

describe('Integration test', () => {
  afterEach(cleanup)

  test('Minimal render display expected text', () => {
    render(<HelloWorld />)
    expect(screen.getByText('Hello, World!'))
  })

  test('Expected greetee is displayed', () => {
    const greetee = 'Universe'
    render(<HelloWorld greetee={greetee} />)
    expect(screen.getByText(`Hello, ${greetee}!`))
  })
})
Write a README
If you want other developers to use your component, it's really important to write a top-notch README file including detailed documentation and examples, as well a the features and benefits of using your component.
This will be published to npm.
Open
/src/README.mdCreate your README file using markdown.
Publishing to npm
We are finally ready to publish our component to npm.
Here is our publishing checklist.
Firstly ensure that the version number in your
package.jsonfile is correct and uses semantic versioning rules. Each time you publish to npm, you must do so with a new version number.Ensure all tests pass:
$ npm testCreate the build files:
$ npm run buildBoth UMD and ESM module formats are created and placed in the
/distfolder. Again, note that React is not bundled in alongside your component. Just your component code and any dependencies.Ensure you are logged into npm. If not type:
$ npm loginPublish your component
$ npm publish
And all done!
A useful thing to do next is to create a test application that pulls in your component from npm. Then you can check that it is working as intended.